Preparing and staining a wooden garage door is a fairly simple process so even the most novice of DIY enthusiasts should be able to do it – as long as they stick to the instructions.
But what are these instructions, I hear you ask?
Don’t worry – we’ve got you covered. Sticking to the straightforward steps we’ve listed below will guarantee your door not only looks great, but it will remain protected from wear and tear as well.
Step One: Cleaning

To clean your garage door, avoid using a power washer since these can damage the surface. Instead, opt for a sponge, some warm soapy water and a little bit ofelbow grease.
Once you’ve wiped your door down sufficiently, rinse it off with a light spray from the garden hose and leave it to dry for at least three hours.
Step Two: Sanding
If you have an automatic garage door, you will need to disengage the mechanism so you can open and close it manually, making the job easier.
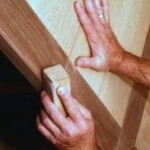
Before you start, protect the edges of your garage door with masking tape. Then, using a medium-fine sandpaper sponge or block, sand the door down by sanding along the grain, rather than against it.
Certain types of wood, including cedar and redwood, contain tannins – natural acids which protect the tree against fire. When sanding your door down, thesetannins can come to the surface, creating a dark effect that spoils the overall look.
If this happens to you, don’t worry – a wood-brightening treatment will restore the wood′s true colour. Simply add this to your door and leave it to dry for at least 24 hours.
Step Three: Staining
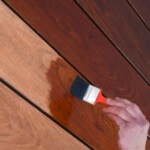
Now for the fun part – applying the stain.
First things first, you’re going to need to clean the door with a dry lint-free cloth. Once this is done, paint the stain on evenly using a brush, avoiding using too much on the brush since this could create drips and brush marks. Apply a consistent quantity of stain with each new dip into the tin.
If you’d rather use a roller or sprayer over a brush, you can, but only for oil-based stains. Whichever method you choose to use though, you shouldn’t nee
d to apply more than one coat.
The stain you choose is completely up to you and can offer many colours and benefits. Some will enhance the grain of the wood, whereas others will obscure it; it is purely a question of personal taste.
Μost of these stains contain pigment and dye in various ratios, with the length of time they’re left on the wood dictating the depth of colouration. Pigments areopaque and will not strongly colour dense woods, but open-pored woods such as pine will become highly coloured. Dyes, on the other hand, are translucent.
Step Four: Finishing 
The stain should take about fifteen minutes to penetrate the wood. After thirty minutes have passed, clean off any excess stain using a dry brush.
As an optional measure after the excess stain has been wiped off, apply a polyurethane coat over the stain to add a gloss finish. However, it’s important to bear in mind that, unlike the untreated oil stain, the polyurethane layer will begin to peel over time. Therefore, if you wish to refinish the door again in the future, you will have to strip the wood down before doing so.
Here at Wessex Garage Doors, we have substantial experience in maintaining and repairing garage doors. If you have any issues and require our assistance, please do not hesitate to give our friendly team a call.